Install Flat Roof Flashing

How To Install Roll Roofing With Your Own Hands Roll Roofing Shed Roof Felt Shed Roof

Pin On Breezeway Mudroom Rooftop Deck

Building And Installing An Up Stand For Skylight Google Search Flat Roof Skylights Roof Installation Roof Skylight

Diy Home Repair Here S How To Locate And Repair A Leak In A Flat Roof Roof Leak Repair Roof Repair Home Repair

Pin On Back Porch

Built Up Tar And Gravel Roofing Systems Hometips Flat Roof Construction Roof Construction Flat Roof

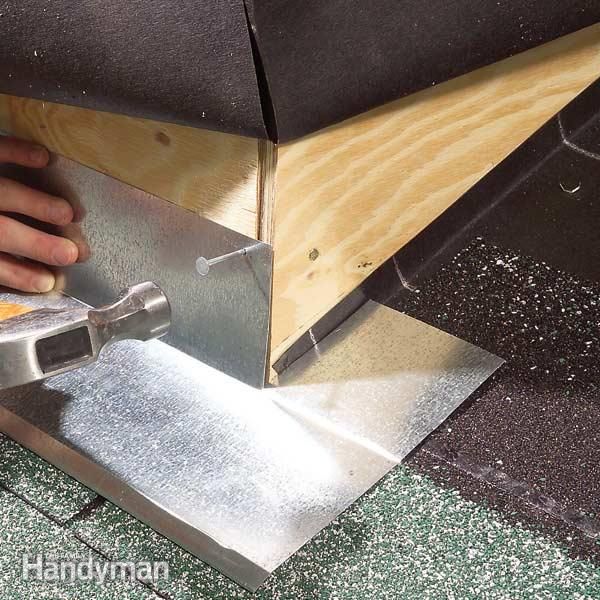
L shaped flashing is a versatile general use flashing used where a uniform or strengthened finish is needed on a 90 surface.
Install flat roof flashing.

Pin On Roof

How To Install Roll Roofing With Your Own Hands Roll Roofing Flat Roof Fibreglass Roof

How To Install Roll Roofing With Your Own Hands Roll Roofing Flat Roof Repair Roofing

Pin On Roof Construction

Pin On Roof Tie In

Roof Vents 101 Install Roof Vents For Proper Attic Ventilation Iko Attic Ventilation Roof Installation Ridge Vent

Pin On Deck Ideas

Pin On Flashing Detail

Pin On Construction Details

Pin On Home Improvement
Pin On Pvc Roof Installation Guide

Flat Roof Drainage The Ashi Reporter Inspection News Views From The American Society Of Home Inspectors In 2020 Flat Roof Roof Shingles Roofing

How To Flash Corrugated Barn Roofing Google Search Roof Installation Metal Roof Installation Corrugated Roofing

Pin On Karkasnik

Flat Roof Leak Repair Paint On Liquid Waterproof Sealant Roof Leak Repair Leaking Flat Roof Flat Roof Repair

Pin On Roofing Ideas

Pin On Roof

Skylights In Metal Roof Fibreglass Roof Metal Roof Aluminum Roof
Https Encrypted Tbn0 Gstatic Com Images Q Tbn 3aand9gcqjkko8nkm53uda0tqsqokgeiud1jh De9ily1gzmetu66zan7e Usqp Cau

Rubber Flat Roof Cost In 2020 Rubber Flat Roof Flat Roof Roof Cost

Single Vs Double Lock Standing Seam Roof Google Search Standing Seam Metal Roof Metal Roof Roof Edge

Pin On Roofs And Gutters

Grp Fibreglass Flat Roof Terrace In 2020 Flat Roof Fibreglass Flat Roof Fibreglass Roof

Residential Roofing In Raleigh Removed A Layer Of Shingles That Were Improperly Installed On A 1 12 Pitch And I Porch Roof Residential Flat Roof Roof Coating

Pin On Construction

Pin On Roofing Stuff

Pin On Gutter Flashing

Pin On Screenshots

Wonderful Tips For Keeping Any Roof In Enviable Shape In 2020 Membrane Roof Pvc Roofing Rubber Roofing

Parapet Capping In Aluminium Now Being Installed New House At Knocknagoug Quin Co Clare Wooden Cladding Exterior Roof Design Flat Roof Construction

Pin On Roofing

Pin On Drew 2018

Pin On Diy And Crafts

Pin On Pvc Roof Installation Guide

Flashings Box Gutter Flat Roof Repair Roofing

Pin On Home Improvment

Pin On Xtreme Services

Pin On Modern Home Interiors

Epdm Roofing Home Depot In 2020 Epdm Roofing Membrane Roof Rubber Roofing

Pin On Roofing

Pin On Products

Pin On Roof Details
Pin On Remodels And Renovating
Https Encrypted Tbn0 Gstatic Com Images Q Tbn 3aand9gcrybzpyp2orwrobrkclztjexdch1k1dfuqjovp0ub7qnrrqhuir Usqp Cau
Source : pinterest.com
