Install Flashing Roof Meets Wall

Pin On Roof

Pin On Building Science

Pin On Framing

Pin On Roof

Pin On Home Improvement

Pin On Skylite

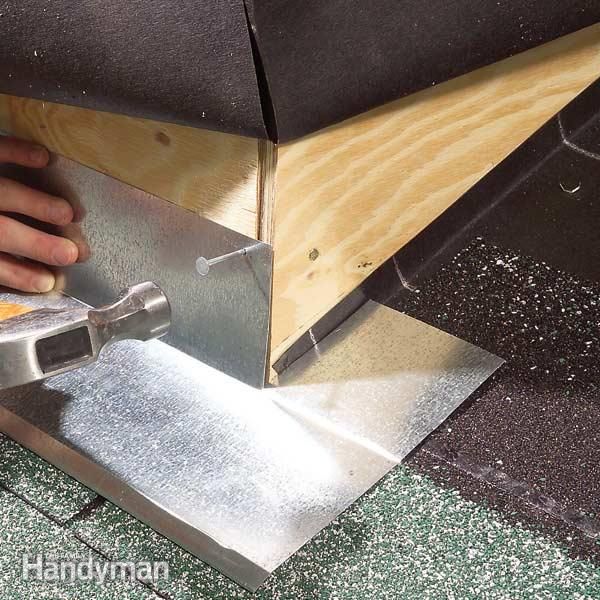
Step flashing redirects the water back onto the shingle.
Install flashing roof meets wall.

Pin On Construction

Pin On Metal Roofs

Pin On Diy Outdoor Projects

Heavy Membranes At Valley And Roof Deck Penetrations Building America Solution Center Roof Repair Diy Roofing Roof Repair

Pin On Skylite

Hi Perf Ridge Vent Sloped Roof Meets High Wall Version Fibreglass Roof Roof Installation Ridge Vent

Pin On Roof

Pin On House Remodel

Pin On For The Home

Pin On Exterior Projects

Pin On Crestmore Exterior

Pin On Xtreme Services

10 Roof Problems And What To Do About Them Roof Problems Home Repairs Roofing

How To Roof A House Diy Roofing Roofing Home Construction

Pin On Roofs

Pin On Uninspiring House Improvements

Pin On Deck

Pin On Roofing
Https Encrypted Tbn0 Gstatic Com Images Q Tbn 3aand9gcqfwuteol9cqcfhrvz4ubixixg8klwbqrunasts9ammzo2vd5m6 Usqp Cau

Pin On Roofs Roofing

Pin On Roof

Pin On Roof Details

Pin On Organize

Pin On Ideas For The House

Steel Stud Parapet Old Timer Wood Blocking And A Cant Anchored To The Structural Deck Restrain Architecture Details Roof Construction Architecture Building
Pin On Flashing

Figure 4 Parapet Water Management Keep Rainwater From Getting Into The Top Of Them Slope The Top Of Them Inward So Roof Design Modern Roofing Building Design

Pin On Construction Techniques

Pin On Details

Pin On Your Pinterest Likes

The Masonry Parapet The Thing To Note Here Is That The Concrete Deck Is The Air Control Layer So An Additional One Is Not Parapet Roof Construction Roof Design

Article About Framing A Roof Saddle To Prevent Water Leakage Where The Roof Meets A Chimney Building Roof Roof Repair Roofing Diy

Pin On Xtreme Services

Pin On Wood Road

Some Great Looking Leadsheet Jobs There Roofmedic How We Like It Techos De Casas Aislamiento De Tejados Techo De Teja

Pin On Metal Roof

Pin On Knowledge

Pin On Roofing

Pin On Rooftop

Pin On Building

Single Vs Double Lock Standing Seam Roof Google Search Standing Seam Metal Roof Metal Roof Roof Edge

Standing Seam Metal Roofing Installation Publications By New England Metal Roof Metal Roof Installation Metal Roof Roof Installation
Pin On Remodels And Renovating
Https Encrypted Tbn0 Gstatic Com Images Q Tbn 3aand9gcrdcyjgmtsaicynjurqroclq6wmvsxg0f9piijklcssdemtqs2o Usqp Cau
Source : pinterest.com
